I have ever bought one MyCloud 6T storage to save my photos and videos, but you know, the My Cloud app is not good to use, so everything I have to connect to my phone with USB cable, and keep the computer on to copy the files to MyCloud disk. Now let me introduce how to import / move MyCloud data to Lomorage.
Table of Contents
- [Config your MyCloud](#Config your MyCloud)
- Mount MyCloud folder to Lomorage server
- Start import MyCloud data to Lomorage
Config your MyCloud
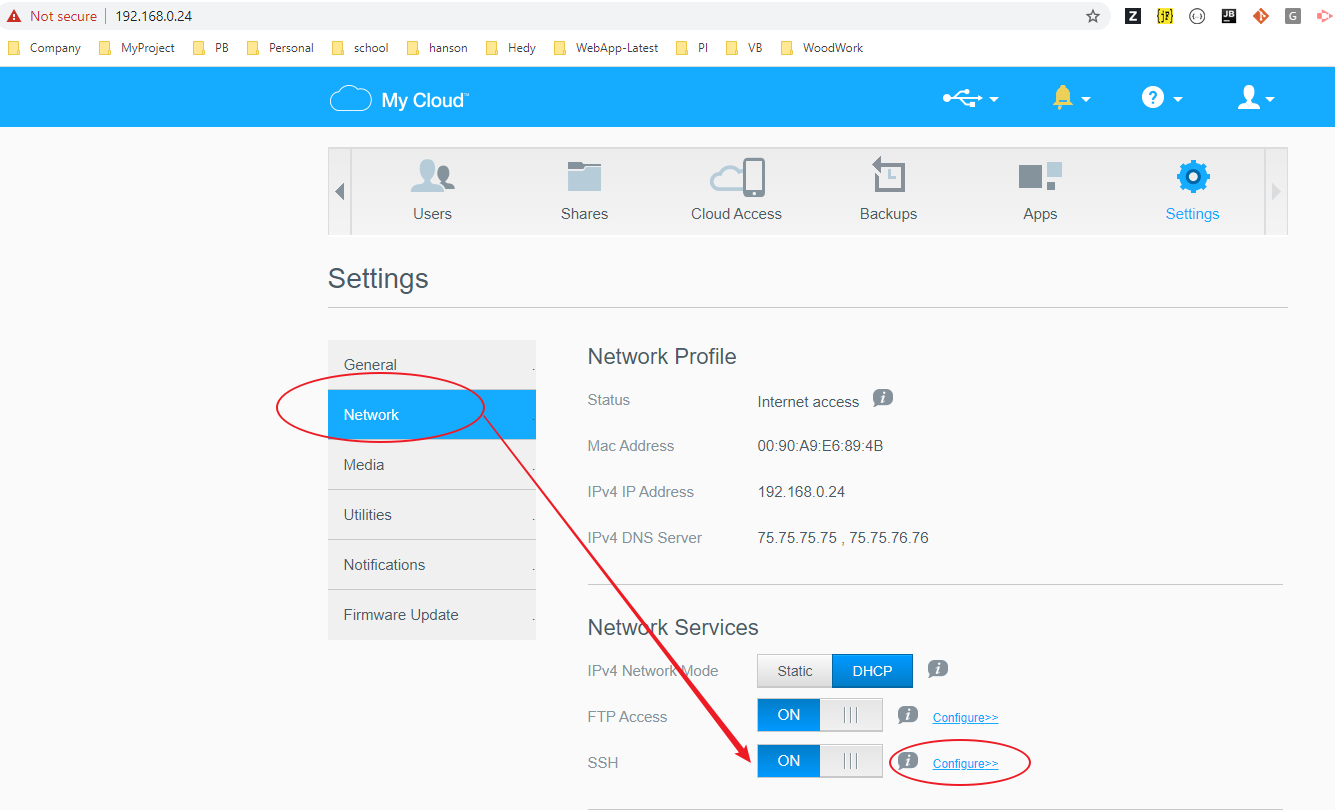
1. Turn on SSH on MyCloud admin page
Open MyCloud admin web page, on settings, turn on SSH and set the password as tips. Like below picture:

2. Connect to MyCloud with SSH
Use below command to connect MyCloud on SSH client like putty or other SSH client tools.
ssh -oHostKeyAlgorithms=+ssh-dss [email protected]
CD to nfs folder, check what shared folder there. Below is my case as the picture:
cd /nfs

The Public folder is which I want to mount to Lomorage.
3. Edit exports file on MyCloud
Inside SSH client, run below command:
sudo vi /etc/exports
And copy below line to the bottom of the file:
/nfs/Public 192.168.0.1/24(rw,subtree_check,secure)
192.168.0.1 is your router’s IP, please change to yours real IP.
Then save to exit.
Till now, MyCloud configure is finished.
Mount MyCloud folder to Lomorage server
1. Connect to Lomorage server with SSH
Inside SSH client, run below command:
The default password for pi is: raspberry.
2. Mount MyCloud folder
Create new folder under home/pi like below:
cd /home/pi
sudo mkdir mycloud
run below command to mount the MyCloud folder.
sudo mount 192.168.0.24:/nfs/Public /home/pi/mycloud
192.168.0.24 is the MyCloud’s IP, please change yours real IP here.
if up command has error, please run below command.
sudo rpcbind start
then run below command again.
sudo mount 192.168.0.24:/nfs/Public /home/pi/mycloud
3. Check MyCloud mounted folder
Run below command and you will see the files from MyCloud disk. Congratulations, key step is done.
cd /home/pi/mycloud
Start import MyCloud data to Lomorage
1. Scan files
Run below command to scan the mounted folder
cd /opt/lomorage/bin
./lomoc s /home/pi/mycloud
[mycloud is the folder which you mounted from the MyCloud/Public]
It need some time to finish the scanning if you have many assets from MyCloud.
If the scanning finished, run below command to check the files.
~/.lomo
Some assets will be categorized if the EXIF info there. Like below:
pi@raspberrypi-lomorage:~/.lomo/links/unclassfied $ ls -l
total 20
drwxr-xr-x 2 pi pi 4096 May 17 16:42  aisnote
drwxr-xr-x 6 pi pi 4096 May 17 16:42  mydoc
drwxr-xr-x 4 pi pi 4096 May 17 16:42  myphone
drwxr-xr-x 9 pi pi 4096 May 17 16:42 'Shared Pictures'
drwxr-xr-x 6 pi pi 4096 May 17 16:42 'Shared Videos'
pi@raspberrypi-lomorage:~/.lomo/links/unclassfied $ cd 'Shared Pictures'/
pi@raspberrypi-lomorage:~/.lomo/links/unclassfied/Shared Pictures $ ls -l
total 28
drwxr-xr-x  3 pi pi 4096 May 17 16:42 2015
drwxr-xr-x  3 pi pi 4096 May 17 16:42 2016
drwxr-xr-x 15 pi pi 4096 May 17 16:42 2017
drwxr-xr-x 13 pi pi 4096 May 17 16:42 2018
drwxr-xr-x 13 pi pi 4096 May 17 16:42 2019
drwxr-xr-x  2 pi pi 4096 May 17 16:42 xiaomi
drwxr-xr-x  2 pi pi 4096 May 17 16:42 来自:iPhone
pi@raspberrypi-lomorage:~/.lomo/links/unclassfied/Shared Pictures $
2. Install tmux
If you are familiar with tmux, please ignore.
Please install tmux on your Lomorage server using below command:
sudo apt install tmux
then:
tmux
3. Start import to Lomorage
Enter into tmux session,run below:
cd /opt/lomorage/bin
./lomoc import -y [lomorage username] [password]
Note: the username and password here is the info which you used to login Lomorage on Phone APP.
Then lomoc application will discovering how many Lomorage servers in your home network, please do that as screen messages.
The log will be print out like below if import success.
success upload /home/pi/.lomo/links/classfied/2010/09/16/Does a Kangaroo Have a Mother, Too_ Book Read Aloud, written by Eric Carle.mp4
success upload /home/pi/.lomo/links/classfied/2010/10/07/If the Dinosaurs Came Back.m4v.mp4
success upload /home/pi/.lomo/links/classfied/2010/10/25/Click, Clack, Moo Cows That Type by - Doreen Cronin.mp4
BTW
Lomorage will provide the new API soon for this importing, next time you do this step with your Lomorage phone APP
Thanks for your reading and enjoy the Lomorage. Welcome comments and feedbacks.